This no longer works
However this overall guide may be useful for some as a guide for setting up Freepbx for Ubuntu. Alex Wiesen Head of Engineering, Google Voice has said the method of using GVsip is against their terms of service. The method described here will flat out not work(it will not register, trying to implement this for google voice will waste your time). I won’t be trying to further circumvent the issue now that we know where google stands regarding this. I still use google hangouts on my android phone, best of luck to everyone, was exciting and fun to use while it lasted. I am now considering other SIP providers for my home phone service. (we finally moved to an alternative paid voip service)
to read more about it start here:
http://www.dslreports.com/forum/r32016984-Asterisk-Google-Voice-SIP-testing-and-technical-discussion~start=1170
click here to see the original guide
How to Guide for Google Voice calls with Freepbx 14 & asterisk gvsip, Ubuntu 18.04
If you follow this tutorial start to finish, google voice calls should work without issue.
gvsip info: https://gvsip.info/
Nafs Gvsip: GitHub - naf419/asterisk at gvsip · GitHub
wiki known issues: Home · naf419/asterisk Wiki · GitHub
Discussion: http://www.dslreports.com/forum/r32016984-Asterisk-Google-Voice-SIP-testing-and-technical-discussion
Last Tested August 16, 2018
Any questions pertaining to this guide, please ask them here.
The discussion link posted above is for those that have gvsip installed and working and wish to contribute logs and help with debugging any issues with gvsip as they crop up.
Install Ubuntu 18.04 server (any ubuntu 18.04 will do, I just prefer server or minimal)
Anywhere that I use 7775551234, replace with your 10-digit google voice number.
When prompted to enter your ITU-T telephone code, search “country dialing codes” (US is 1)
ffmpeg+lame optional, required for m4a+mp3, HTML5 format converters.
mailutils optional, required for sending email with voicemail attachment, or Module Update emails.
fail2ban optional, recommended for security.
mongodb optional, used for some XMPP features, have had no trouble without it.
Install dependencies:
sudo apt install -y software-properties-common
sudo add-apt-repository ppa:ondrej/php
sudo apt update
sudo apt dist-upgrade -y

sudo apt install -y git curl apt-transport-https net-tools mpg123 sox apache2 \
libapache2-mod-php5.6 libapache2-mod-security2 libmysqlclient-dev mysql-client \
mysql-server php-pear php5.6 php5.6-cgi php5.6-cli php5.6-curl php5.6-fpm \
php5.6-gd php5.6-mbstring php5.6-mysql php5.6-odbc php5.6-xml \
unixodbc ffmpeg lame fail2ban mailutils mongodb
Install nodejs (optional, but required for UCP module, which I find useful so I recommend installing):
curl -sL https://deb.nodesource.com/setup_8.x | sudo -E bash -
sudo apt install -y nodejs
Prep system for asterisk & Freepbx:
sudo a2enmod rewrite
sudo a2enmod proxy_fcgi setenvif
sudo a2enconf php5.6-fpm
sudo sed -i 's/AllowOverride None/AllowOverride All/' /etc/apache2/apache2.conf
sudo sed -i 's/^\(User\|Group\).*/\1 asterisk/' /etc/apache2/apache2.conf
sudo sed -i 's/^memory_limit =.*/memory_limit = 256M/' /etc/php/5.6/apache2/php.ini
sudo sed -i 's/^upload_ma.*/upload_max_filesize = 120M/' /etc/php/5.6/apache2/php.ini
sudo rm -rf /var/www/html
Clone Naf’s gvsip branch:
cd /usr/src
sudo git clone https://github.com/naf419/asterisk.git --branch gvsip
cd asterisk
sudo sed -i 's/MAINLINE_BRANCH=.*/MAINLINE_BRANCH=15/' build_tools/make_version
sudo contrib/scripts/install_prereq install
sudo contrib/scripts/get_mp3_source.sh
sudo reboot
Next we need to build asterisk:
cd /usr/src/asterisk
sudo ./configure
sudo make menuselect.makeopts

sudo menuselect/menuselect --enable format_mp3 --enable app_macro \
--enable CORE-SOUNDS-EN-WAV --enable CORE-SOUNDS-EN-ULAW menuselect.makeopts

sudo make
sudo make install
sudo make config
sudo ldconfig
sudo update-rc.d -f asterisk remove
Set initial config and permissions:
sudo touch /etc/asterisk/{modules,ari,statsd}.conf
sudo cp configs/samples/smdi.conf.sample /etc/asterisk/smdi.conf

sudo useradd -m asterisk
sudo chown asterisk. /var/run/asterisk
sudo chown -R asterisk. /var/{lib,log,spool}/asterisk
sudo chown -R asterisk. /etc/asterisk /usr/lib/asterisk /var/www
Setup Mysql ODBC driver (Optional, only used for CDR/CEL, to view click here)
cat << EOF | sudo tee --append /etc/mysql/conf.d/mysqld.cnf
[mysqld]
sql_mode = "NO_ENGINE_SUBSTITUTION"
EOF
sudo service mysql restart
cat << EOF | sudo tee --append /etc/odbc.ini
[MySQL-asteriskcdrdb]
Description=MySQL connection to asteriskcdrdb database
driver=MySQL
server=localhost
database=asteriskcdrdb
Port=3306
Socket=/var/run/mysqld/mysqld.sock
option=3
EOF
Download & Install the driver:
cd
wget https://cdn.mysql.com/Downloads/Connector-ODBC/5.3/mysql-connector-odbc-5.3.11-linux-ubuntu18.04-x86-64bit.tar.gz
tar -xzf mysql-connector-odbc-5.3.11-linux-ubuntu18.04-x86-64bit.tar.gz
rm -f mysql-connector-odbc-5.3.11-linux-ubuntu18.04-x86-64bit.tar.gz
cd mysql-connector-odbc-5.3.11-linux-ubuntu18.04-x86-64bit
sudo cp bin/* /usr/bin/
sudo cp lib/* /usr/lib/x86_64-linux-gnu/odbc/
sudo myodbc-installer -a -d -n "MySQL" -t "Driver=/usr/lib/x86_64-linux-gnu/odbc/libmyodbc5a.so"
sudo ldconfig
sudo odbcinst -i -d -f /etc/odbcinst.ini
sudo odbcinst -i -s -l -f /etc/odbc.ini
sudo odbcinst -q -d
Install Latest Freepbx:
sudo su
cd /usr/src
wget http://mirror.freepbx.org/modules/packages/freepbx/freepbx-14.0-latest.tgz
tar vxfz freepbx-14.0-latest.tgz
rm -f freepbx-14.0-latest.tgz
cd freepbx
./start_asterisk start
./install -n
exit
Now setup a Systemd service:
cat << EOF | sudo tee /lib/systemd/system/freepbx.service
[Unit]
Description=FreePBX VoIP Server
After=mysql.service

[Service]
Type=oneshot
RemainAfterExit=yes
ExecStart=/usr/sbin/fwconsole start -q
ExecStop=/usr/sbin/fwconsole stop -q

[Install]
WantedBy=multi-user.target
EOF
Next enable and start the service:
sudo systemctl enable freepbx
sudo systemctl start freepbx
sudo systemctl status freepbx
If you prefer or required init.d instead of systemd click here
sudo nano /etc/init.d/freepbx
#! /bin/bash

### BEGIN INIT INFO
# Provides:          freepbx
# Required-Start:    $local_fs $network
# Required-Stop:     $local_fs
# Default-Start:     2 3 4 5
# Default-Stop:      0 1 6
# Short-Description: freepbx service
# Description:       Run Freepbx service
### END INIT INFO

FWCONSOLE=/var/lib/asterisk/bin/fwconsole
LOCKFILE=/var/lock/subsys/freepbx

start() {
        echo -n "Starting FreePBX Components: "
        $FWCONSOLE start
        RETVAL=$?
        [ $RETVAL -eq 0 ] && touch $LOCKFILE
        return $RETVAL
}

stop() {
        echo -n "Shutting down FreePBX Components: "
        $FWCONSOLE stop
        RETVAL=$?
        [ $RETVAL -eq 0 ] && rm -f $LOCKFILE
        echo
        return $RETVAL
}

status() {
                if pgrep -x asterisk > /dev/null; then
                echo -e "Asterisk is Running\r\n"
                else
                echo -e "Asterisk appears to be NOT running\r\n"
                fi
                if pgrep -x mysqld > /dev/null; then
                echo -e "MySQL is Running\r\n"
                else
                echo -e "MySQL appears to be NOT running\r\n"
                fi
                if pgrep -x httpd > /dev/null; then
                echo -e "Apache is Running\r\n"
                else
                echo -e "Apache appears to be NOT running\r\n"
                fi
}

case "$1" in
    start)
        start
        ;;
    stop)
        stop
        ;;
    status)
        status
        ;;
    restart)
        stop
        start
        ;;
    reload)
        $FWCONSOLE chown
        $FWCONSOLE reload
        $FWCONSOLE stop
        $FWCONSOLE start
        ;;
    condrestart)
        [ -f /var/lock/subsys/freepbx ] && restart || :
        ;;
    *)
        echo "Usage: freepbx {start|stop|status|reload|restart"
        exit 1
        ;;
esac
exit $?
ctrl + x to save and exit
sudo chmod 755 /etc/init.d/freepbx
sudo update-rc.d freepbx defaults
sudo systemctl enable freepbx
sudo reboot
Upon reboot your asterisk/freepbx/node should start automatically.
sudo systemctl status freepbx
Now open a browser and enter the machines http://IP.ADDRESS.GOES.HERE/index.php to finish setup. You will be asked to create an admin account and choose localization settings.
http://192.168.5.240/index.php
Once the dashboard loads you will see error “No Conference Room App”, Ignore it.
The first save+apply will make that error go away, next visit to Dashboard it will be gone.
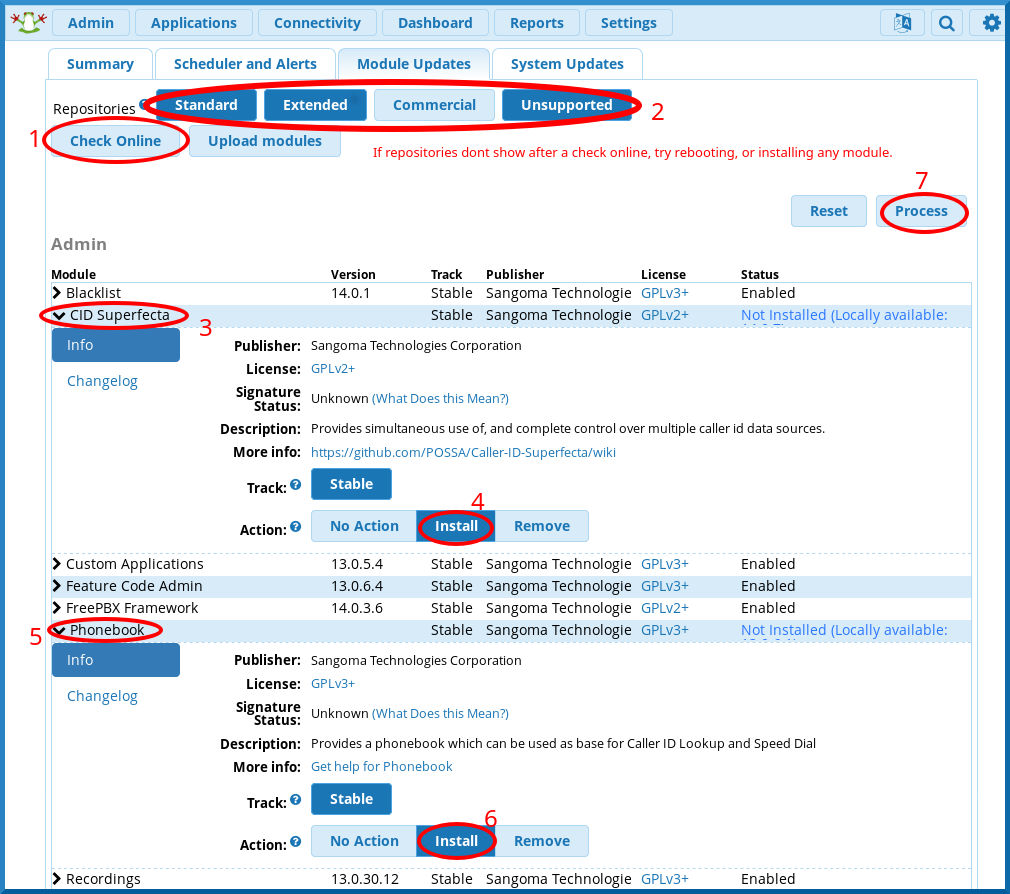
Admin -> Module Admin
 Check Online, look for modules that have updates,
  click into them and select download and upgrade,
  I recommend installing "CID Superfecta" and "Phonebook" modules.
  If using "User Control Panel", install now so its ready during extension creation.
   UCP requirements, "user management", "process management", "certificate manager"
 then click process at the top or bottom of page.

 Other Very useful modules to install (optional):
  Blacklist, IVR, Ring Groups
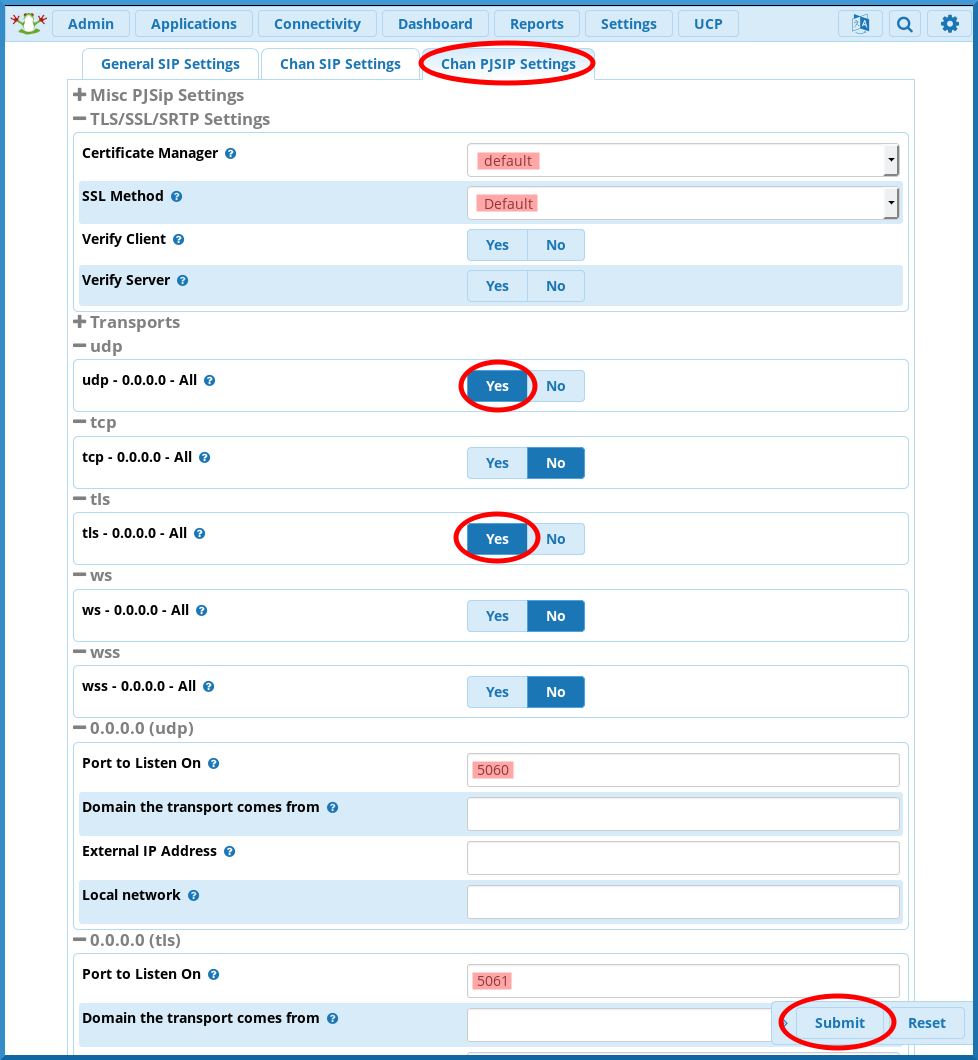
Settings -> Asterisk SIP Settings
 "General SIP Settings"-Tab
   NAT Settings, External Address, click detect network settings
   Delete TURN server username & pass
   Stun Server Address: stun.l.google.com:19302   (Optional, usually)

 "Chan PJSIP Settings"-Tab
   tls - 0.0.0.0 - All - YES
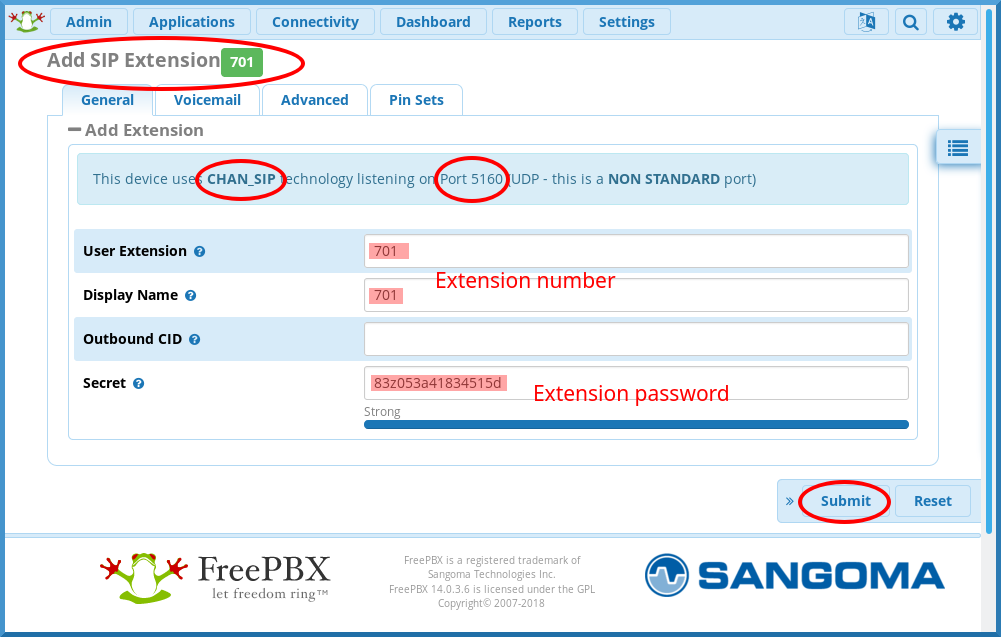
Applications -> Extensions
 Add New Chan_SIP Extension
  701,701,(blank),password-for-extension
  Optionally on "Voicemail Tab" voicemail enabled, set password/email, attachment yes
Sumbit
Connectivity -> Trunks
 Add Trunk -> Add Custom Trunk
  "General"-Tab
   Trunk Name: gvtrunk1
   Outbound CallerID 7775551234

  "custom Settings"-Tab
   Custom Dial String: PJSIP/$OUTNUM$@gvsip1
Submit

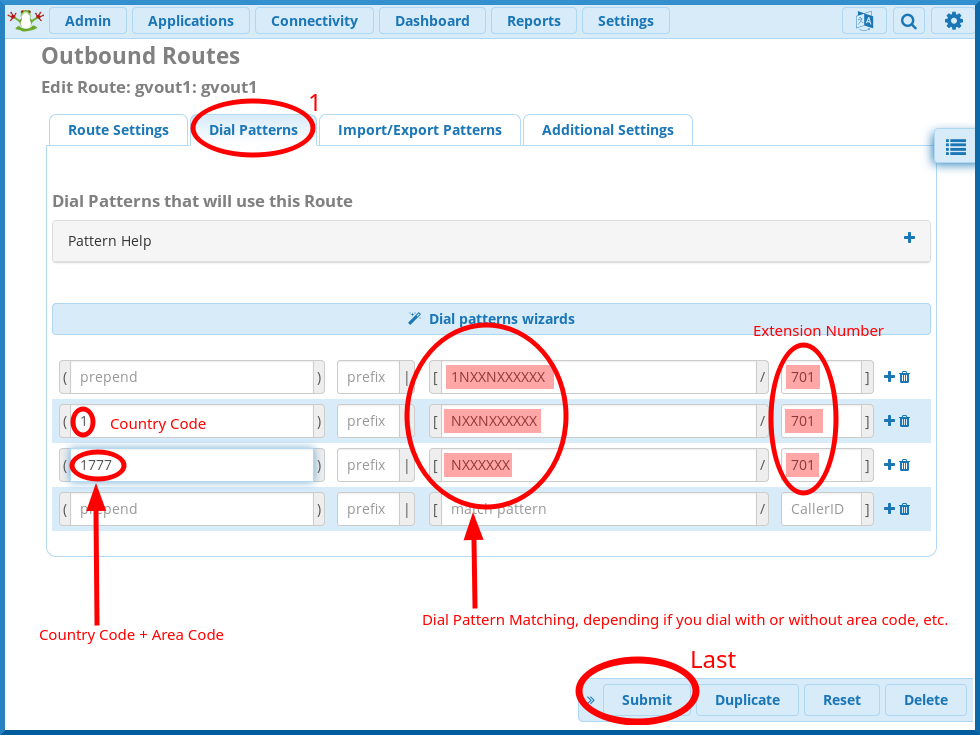
Connectivity -> Outbound Routes
 Add Outbound Route
  "Route Settings"-Tab
   Route Name: gvout1
   Route CID: (blank)
   override extension No
   route password: (blank)
   Route type: (leave default)
   music on hold?: (leave default)
   route position: (leave default)
   trunk sequence for matched routes: gvtrunk1
   optional destination on congestion: Normal Congestion
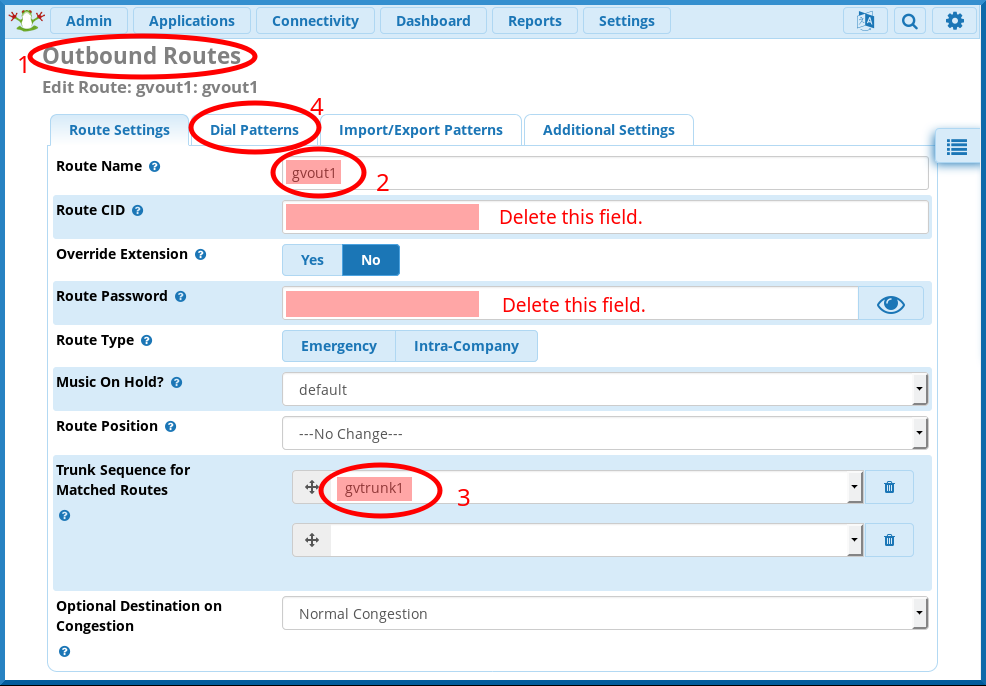
  "Dial Patterns"-Tab
   (blank),(blank),1NXXNXXXXXX,701
   1,(blank),NXXNXXXXXX,701
   1777,(blank),NXXXXXX,701
Sumbit
Connectivity -> Inbound Routes
 Add Inbound Route
  "General"-Tab
   Description: gvin1
   DID Number: 7775551234
   Set Destination: 701
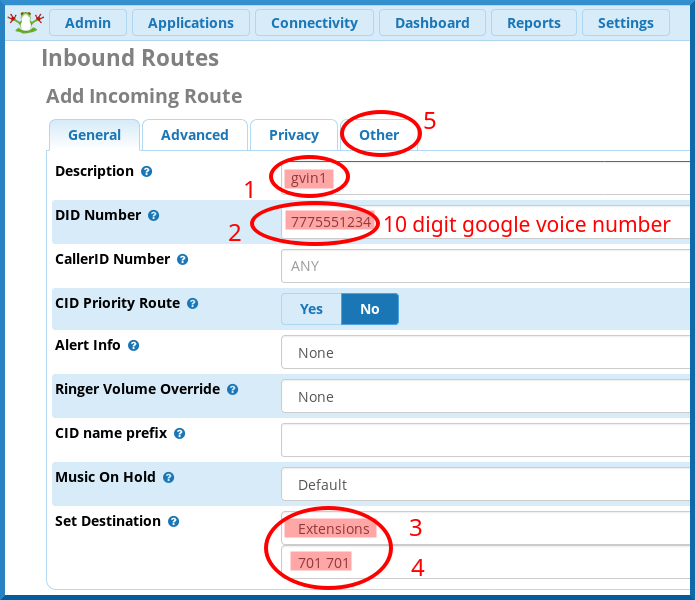
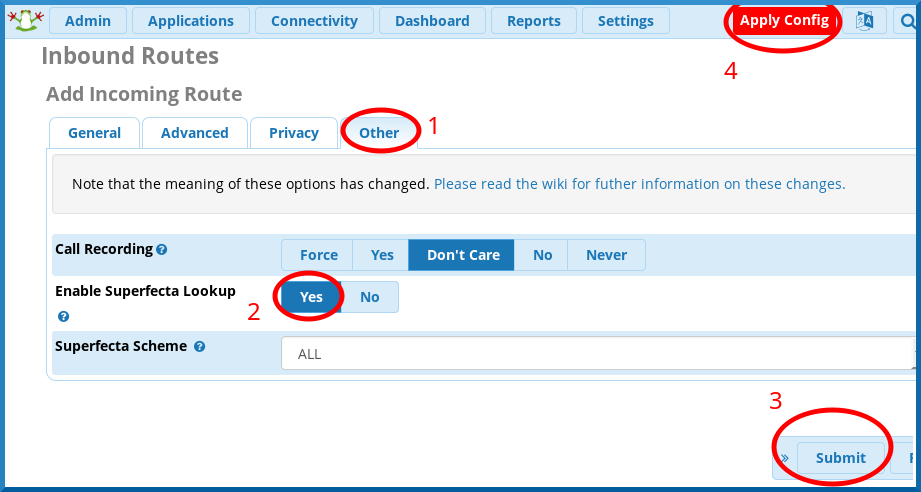
  "Other"-Tab
   Enable Superfecta Lookup: YES
Submit & Apply
Next you need to configure your softphone, ATA, or sip phone to use your extension.
with softphone CSipSimple you create a “Basic” type account, toward the bottom, lt will prompt for four fields
Account name: 701
User: 701
Server: 192.168.5.240:5160
Password: passwordhere
Below is a picture showing my PAP2T ATA, the config will be different in each SIP phone, I have highlighted the important parts.

Edit pjsip_custom_post.conf to make use of the new gvsip:
There are 6 lines <change me> that need changed, make sure you get them all, look carefully
Actually 7 lines including contact_user=7775551234 (set this to your 10 digit google voice number)
sudo nano /etc/asterisk/pjsip_custom_post.conf
debug=true
keep_alive_interval=90

[gvsip1]
type=registration
contact_user=7775551234
outbound_auth=gvsip1
server_uri=sip:obihai.sip.google.com
outbound_proxy=sip:chirp.telephony.goog:5061\;transport=tls\;lr\;hide
client_uri=sip:<your choice for device identifier>@obihai.sip.google.com
retry_interval=60
support_path=yes
support_outbound=yes
line=yes
endpoint=gvsip1
contact_additional_params=obn=<name to appear on GV settings page>
transport=0.0.0.0-tls
transport_reuse=no

[gvsip1]
type=auth
auth_type=oauth
refresh_token=<your oauth refresh token>
oauth_clientid=<your oauth client id>
oauth_secret=<your oauth client secret>
username=<your choice for device identifier>
realm=obihai.sip.google.com

[gvsip1]
type=aor
contact=sip:obihai.sip.google.com

[gvsip1]
type=endpoint
context=from-pstn-e164-us
disallow=all
allow=ulaw
allow=opus
outbound_auth=gvsip1
outbound_proxy=sip:chirp.telephony.goog:5061\;transport=tls\;lr\;hide
aors=gvsip1
direct_media=no
ice_support=yes
rtcp_mux=yes
media_use_received_transport=yes
outbound_registration=gvsip1
ctrl+x to save and exit
here is how to get your OAuth 2.0 Client ID, Client Secret, and refresh token for gvsip: How-To Guide for Creating Oauth credentials for Google Voice gvsip
For <your choice for device identifier>, make it unique such as gv7775551234
Also None of the fields that need edited should include quotes in your pjsip_custom.conf file
If you use the above guide for getting your refresh token from google, you will notice they present it with it in quotes, but when you enter the token into the file it should be without the quotes
sudo reboot
sudo asterisk -rvvv
Both the asterisk CLI and log files can help with troubleshooting if things are not working properly.
You can view the asterisk log files from Reports → Asterisk Log Files
Start by looking for the ERROR[] lines that are in RED.
The asterisk CLI is useful to watch as your troubleshooting something such as trying to place or receive a call.
Now try placing a call from one of your extensions, If it does not work, try 1-2 more reboots, if it still does not work consult your Asterisk CLI and Asterisk Log files for clues.
After you have placed some calls both incoming and outgoing. You should start securing and locking down your installation. This is a VERY broad topic, and there is no way I can cover it all here, but I will touch on a couple basics.
First goto Settings → Asterisk SIP Settings and turn off guest and anonymous use of your Server.
This is to prevent random people from registering and placing calls with your phone number.

Next, simply installing fail2ban does not setup the jail for asterisk, only for sshd, so lets make a jail for asterisk that uses the default log configuration, this can be adjusted to point to different log files if you have made adjustments to your log file settings.
!! IMPORTANT !! TEST YOUR EXTENSION IS PROPERLY REGISTERING AND WORKING FIRST!
If not you will ban your own phone, and then wonder why it is not registering or working.
If you suspect you banned yourself, you can check for your IP: sudo fail2ban-client status asterisk
cat << EOF | sudo tee --append /etc/fail2ban/jail.local
[asterisk]
enabled = true
port = 5060,5061,5160,5161,4569
action = %(banaction)s[name=%(__name__)s-tcp, port="%(port)s", protocol="tcp", chain="%(chain)s", actname=%(banaction)s-tcp]
         %(banaction)s[name=%(__name__)s-udp, port="%(port)s", protocol="udp", chain="%(chain)s", actname=%(banaction)s-udp]
         %(mta)s-whois[name=%(__name__)s, dest="%(destemail)s"]
logpath = /var/log/asterisk/full
maxretry = 2
bantime = 172800
findtime = 1200
EOF
Next load the new settings and see the status before and after:
sudo fail2ban-client status
sudo fail2ban-client reload
sudo fail2ban-client status
sudo fail2ban-client status asterisk
There are LOTS of guides that cover security, search google for securing ubuntu server, securing freepbx, securing asterisk, etc and you should find plenty of info.
I recommend backing up your system prior to making changes if you have a working system
That way you can always restore from a backup.
Install Support for the Opus codec for HD Voice (optional, to view click here)
cd /usr/src
sudo wget http://downloads.digium.com/pub/telephony/codec_opus/asterisk-16.0/x86-64/codec_opus-16.0_current-x86_64.tar.gz
sudo tar -xvzf codec_opus-16.0_current-x86_64.tar.gz
cd codec_opus-16.0_1.3.0-x86_64
sudo cp codec_opus.so /usr/lib/asterisk/modules/
sudo cp codec_opus_config-en_US.xml /var/lib/asterisk/documentation/thirdparty
sudo reboot

sudo asterisk -rvvvv
core show translation
module show like opus
(The above two commands should show opus is loaded)

Settings -> Asterisk SIP Settings
 "General SIP Settings"-Tab
   Audio Codecs Section at bottom, enable Opus, and set codec priorities.
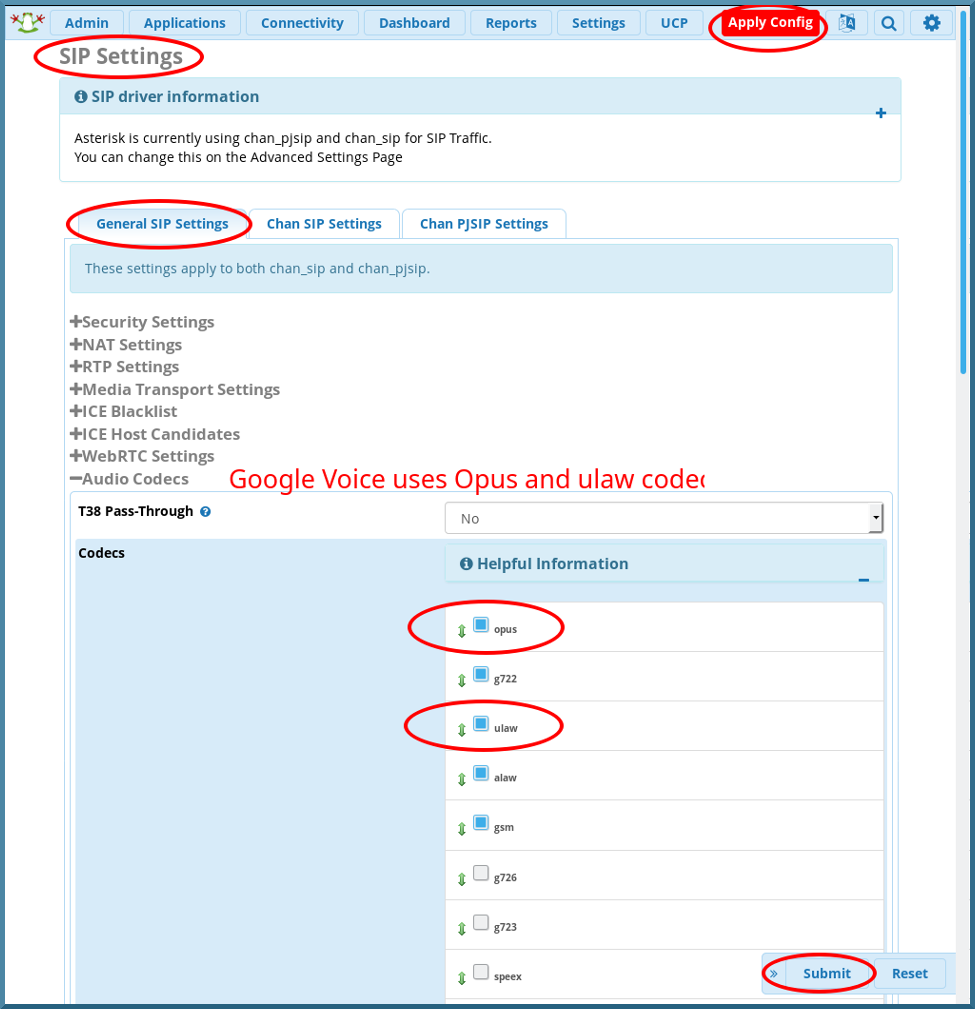
Opus may only work with intel CPUs, if Opus breaks your asterisk then remove it:
sudo rm /usr/lib/asterisk/modules/codec_opus.so
sudo rm /var/lib/asterisk/documentation/thirdparty/codec_opus_config-en_US.xml
sudo reboot
To Later update the system with Naf’s latest changes:
sudo apt update
sudo apt dist-upgrade

cd /usr/src/asterisk
sudo make clean
sudo make distclean
sudo git checkout HEAD^ build_tools/make_version
sudo git pull
sudo sed -i 's/MAINLINE_BRANCH=.*/MAINLINE_BRANCH=15/' build_tools/make_version
sudo contrib/scripts/install_prereq install
sudo ./configure
sudo make menuselect.makeopts

sudo menuselect/menuselect --enable format_mp3 --enable app_macro \
--enable CORE-SOUNDS-EN-WAV --enable CORE-SOUNDS-EN-ULAW menuselect.makeopts

sudo make
sudo make install
sudo reboot


 )
)