UPDATE 2019-01-15: The Workaround at the bottom of this post is no longer necessary. The install-pollytts script will install the recently released updated tts and ttsengines modules from the FreePBX Edge Repo automatically. The following module versions provide the necessary Polly TTS support in the GUI:
tts v13.0.11
ttsengines v13.0.7.4
UPDATE 2019-01-10: I have altered the install-pollytts script to preserve existing keys, region, and voice selection from polly.js so you can run the script again to alter a single setting or to simply update the components without having to re-enter everything again (perfect for quickly changing Polly Voices). I have also updated polly.js to delete the extra .mp3 file after conversion to .wav to free up space. If you have already installed prior to 1/10/2019, simply download a fresh copy of the install-pollytts script and run it to update everything without losing existing config.
Well, that went way faster than I expected. Everything is ready and tested. I even placed the entire Gettysburg Address in a TTS element and it played back the entire speech PERFECTLY. All we need is the changes merged for the modules to add the ‘polly’ engine and we’re golden. I’m writing out these instructions now, but note that you won’t be able to use Polly until one of the following two conditions are met:
-
You make your own alteration to /var/www/html/admin/modules/tts/agi-bin/propolys-tts.agi to add the polly engine —Yes, I say the module copy since this will allow you to Apply Config without losing the edit every time. You can set Enable Module Signature Checking to No in Settings > Advanced Settings (temporarily, until the modules are officially updated) to get rid of the Security Warning— That said, there’s a “noob-friendly” workaround outlined below for performing this change
-
My changes are merged into the FreePBX tts\ttsengines modules by Sangoma and released as official updates, which will happen once they have had a chance to review and follow their normal procedure for these things (I’ll post back here when that happens)
Alright, folks, this is super simple. Access the server via SSH or local console and execute the following commands to download and run the installation script:
wget https://files.thewebmachine.net/install-pollytts.sh
chmod 755 ./install-pollytts.sh
./install-pollytts.sh
NOTE: If you are using AWS FreePBX from TheWebMachine Networks, simply execute this command to run the installation:
smartupgrade install-pollytts
Towards the end of the installation, you will be asked for the following information:
- AWS Access Key ID
- AWS Secret Access Key
You can generate these keys from the AWS IAM Management Console: https://console.aws.amazon.com/iam/home - AWS Region Code
Use the region closest to your server for optimal performance; will default to ‘us-east-1’ if not specified. Here’s a list of proper region codes: Regions and Zones - Amazon Elastic Compute Cloud - AWS Polly Voice ID
Will default to ‘Joanna’ (en-US) if not specified. Use a Voice ID from this page: Available voices - Amazon Polly
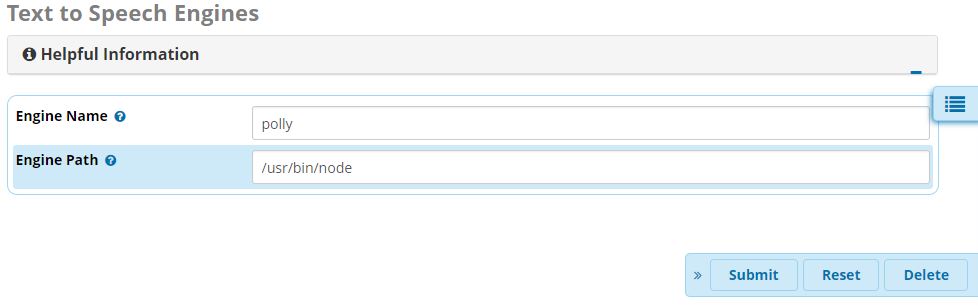
Once the script is finished, you’ll want to add the ‘polly’ engine via Settings > Text to Speech Engines and specify ‘/usr/bin/node’ as the Engine Path:
Please be advised of the following limitations when using the AWS Polly engine to create TTS elements:
-
You CANNOT use single quotes/apostrophe (') including contractions (use dont instead of don’t), double quotes ("), or carriage returns/newlines in your spoken text. Any of these (and possibly other special chars) will break the playback and you will get either only a partial audio file or no audio at all. Polly will automatically pronounce contractions without an apostrophe (like dont) correctly
-
AWS Polly has a 3000-character limit per API request. If you send more than this in a single TTS element, you will get no audio. If you need to provide spoken word longer than 3000-chars, simply break it down into multiple TTS elements and string them together in sequence within your dialplan (Part1 Destination → Part2; Part2 Destination → Part3, etc)
—WORKAROUND: BEFORE THE UPDATED TTS MODULE IS OFFICIALLY RELEASED—
Since the updates to tts and ttsengines modules are still pending review by Sangoma, you’ll need to add the engine manually in order to use it right now. I have decided to make this as painless as possible (no direct file edits). These steps will have you download a modified copy of propolys-tts.agi to replace within the tts module (the same code pending review in git). Simply run these commands via SSH or the local console:
cd /var/www/html/admin/modules/tts/agi-bin/
mv propolys-tts.agi propolys-tts.agi.bak
wget https://files.thewebmachine.net/propolys-tts.agi
chown asterisk:asterisk propolys-tts.agi
chmod 755 propolys-tts.agi
After you have made this change, you will start seeing a Security Warning appear at the top of the GUI. You can turn this off in Settings > Advanced Settings and set Enable Module Signature Checking to No. Once the official tts module has been updated, you should go back and turn Enable Module Signature Checking to Yes, as this helps to protect your server.
—END OF WORKAROUND—
That’s it! Now you may create new TTS elements in Applications > Text to Speech and select ‘polly’ as the engine to use.
FINAL NOTES ABOUT AWS POLLY: AWS gives customers 5 million characters per month for free for the first 12 months, starting from your first request. You pay for usage beyond that ($4 per million chars). The way the TTS module is currently written, your TTS audio files are preserved in /var/lib/asterisk/sounds/tts/ after the first time they are encoded. So long as that TTS element text field remains unchanged and you don’t change Polly Voices, no additional requests will be made to Polly for that TTS element. AWS Polly Pricing: Amazon Polly Pricing