Introduction
Using the Commercial System Admin module makes this a bit easier. It would still be possible to do this without the Commercial System Admin module, but you will need to configure many more options manually through editing the files of course. See “Setup Postfix Manually” (below) in the references section.
Many of the Asterisk, FreePBX, Linux gurus out there don’t yet fully understand, is that Office 365 is more paranoid than most SMTP systems. It requires a few things before an email can be relayed, one of them being from a known account, and the other one being that it has to be from a known good IP. These type of setups will become standard fare for new email systems, and will be accepted best practice going forward.
Requirements for this method
- You are using a fixed public IP address with DNS entry that works in the wild.
- You don’t need IPv6 on your PBX (as Office 365 does not support it, yet)
- A known good Office 365 account and password
- Commercial System Admin module (It has the handy SMTP Email Setup)
NOTE: There is another method that you can use to setup emails for FreePBX and Office 365. I had this working nicely as well, and that is to use another SMTP relay on your local network. I did that with my IIS server SMTP relay, and it worked great. I would prefer using that method actually, however, not all my clients have an on-prem setup like that, and I wanted to ensure that I could get this to work with their Office 365 setup as is. If you want more information on how to setup IIS with SMTP relay, see reference #4 at the end of this post.
STEPS
A. Tell Office 365 you are “coming to dinner”. In that sense you will need to edit your DNS record and setup an SPF text record for your domain that informs Office 365 that you are a “known and trusted system”, and that your public facing IP address can be trusted. Since Office 365 requires an SPF record already, you will not so much need to add it, but modify the existing one it so that it include the external IP of your PBX. So, with aaa.bbb.ccc.ddd representing your public pbx ip address, this is what your TEXT record should read as:
v=spf1 ip4:aaa.bbb.ccc.ddd include:spf.protection.outlook.com ~all ← be sure to replace aaa.bbb.ccc.ddd with your public ip address
If you already have an ip4: in there with an IP, you can add another.
B. Modify your /etc/postfix/generic by adding these lines, replacing [email protected] with a real email account in your Office 365 system.
root [email protected]
root@localhost [email protected]
[email protected] [email protected]
root@freepbx [email protected]
[email protected] [email protected]
asterisk [email protected]
asterisk@localhost [email protected]
[email protected] [email protected]
asterisk@freepbx [email protected]
[email protected] [email protected]
vm@asterisk [email protected]
asterisk@ [email protected]
@freepbx.localdomain @YourO365Domain.com
C. Add the following to the end of /etc/postfix/main.cf
smtp_generic_maps = hash:/etc/postfix/generic
and
inet_protocols = ipv4
The inet_protocols = ipv4 tells postfix to not use ipv6. ipv6 is bad mojo with most SMTP servers.
Reload postfix by running these commands:
postmap /etc/postfix/generic
service postfix restart
OPTIONAL: I also took the liberty to disable IPv6 at the Centos OS level as well. I do not need IPv6, nor is it supported end to end everywhere, so I don’t want it to ever be an issue until I know IPv6 is supported everywhere. If you want to disable IPv6 at the OS level you can do so by going to /etc/sysctl.conf and adding the following line: net.ipv6.conf.all.disable_ipv6 = 1 save the file, then reload the system ip configuration by issuing this command: sysctl -p Keep in mind you will still need to disable IPv6 in main.cf to inform postfix that you are only using ipv4
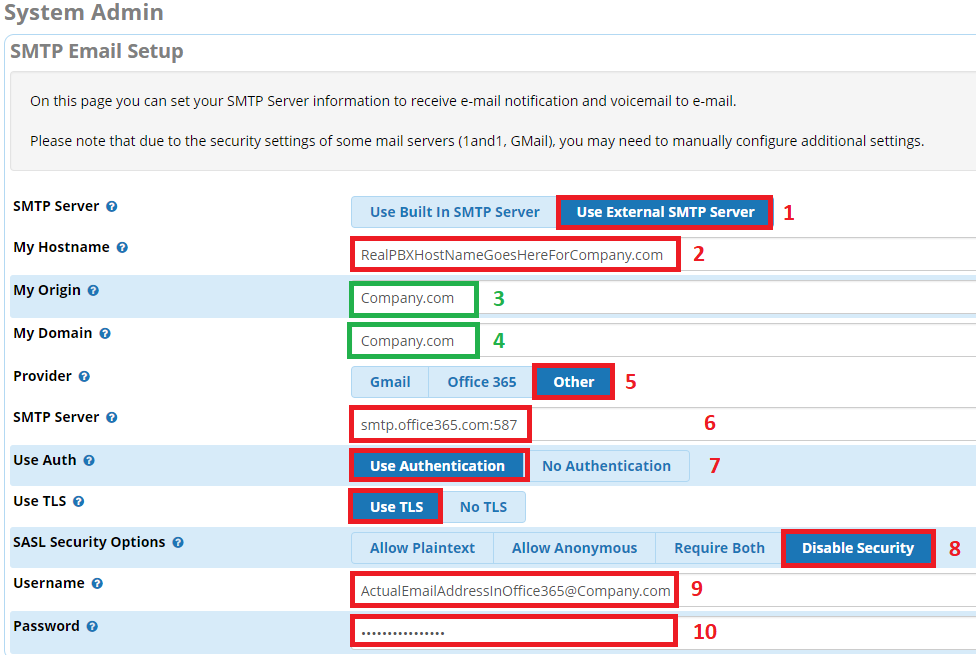
D. Using the Commercial System Admin module, go to Email Setup. Use these settings (see graphic below)
SMTP Server: Use External SMTP Server [1]
My Hostname: Put in your real PBX hostname. This must resolve back to your PBX external IP. [2]
My Origin: YourRealDomain.com This can be anything as far as I can tell [3]
My Domain: YourRealDomain.com Same as above [4]
Provider: Other ← Don’t use Office 365, as you want explicit control of the settings here [5]
SMTP Server: smtp.office365.com:587 [6] This is a real value for Office 365 smtp server, don’t forget the port number
Use Auth: Use Authentication [7]
Use TLS: Use TLS (Hell yes!) [no number, ooops]
SASL Security Options: Disable Security [8]
Username: [email protected] ← Use a real office365 account [9]
Password: TheRealPassword <---- Use real office365 account password [10]
E. Click on the Submit button
TESTING / DEBUGGING
- While still in Email Setup, Click on Debug, and then use a real email address to sent it to. The output of the debug should show you want is right/wrong and should help if you still have issues with the setup.
- If you need more details on your smtp communications, you can always get to /var/log/maillog to gather more information. BE SURE TO TAKE A CAREFUL LOOK AT ALL OF THE FROM ADDRESSES IN THERE, AND MAKE SURE THEY INDICATE COMING FROM YOUR DOMAIN, OR THEY WILL NOT WORK. There is a possibility that you might need to add/adjust an entry in your /etc/postfix/generic file to ensure this happens.
- Use postconf -n to get a dump of all parameters which may of been altered from the default ones.
- View /etc/postfix/sasl_passwd and make sure your credentials show up there as you would expect them to be
References
- Setup Postfix Manually - https://wiki.freepbx.org/display/PPS/Setup+Postfix+Manually
- How to set up a multifunction device or application to send email using Office 365 - See section 3, click on “Settings for Office 365 SMTP relay” How to set up a multifunction device or application to send email using Microsoft 365 or Office 365 | Microsoft Learn
- Turning off IPv6 on CentOS - How To Disable IPv6 on CentOS - Networking HowTos
- How to configure IIS for relay with Office 365 - How to set up a multifunction device or application to send email using Microsoft 365 or Office 365 | Microsoft Learn
- Postfix documentation