I would like to share two tutorials on setting VPN. Both tutorials are in the FreePBX Documentation Center Sangoma Documentation
1. pfsense
Here, I set up vpn client and addressed traffic routing so remote phones with no vpn capability can have a vpn connection to the FreePBX server.
Step-by-step guide
I assume you have pfsense up and running. For installation of pfsense I recommend reviewing pfSense Documentation pfSense Documentation | pfSense Documentation or some other tutorials https://youtu.be/9kSZ1oM-4ZM.
In FreePBX:
- Enable VPN Server in FreePBX.

- Create VPN Client
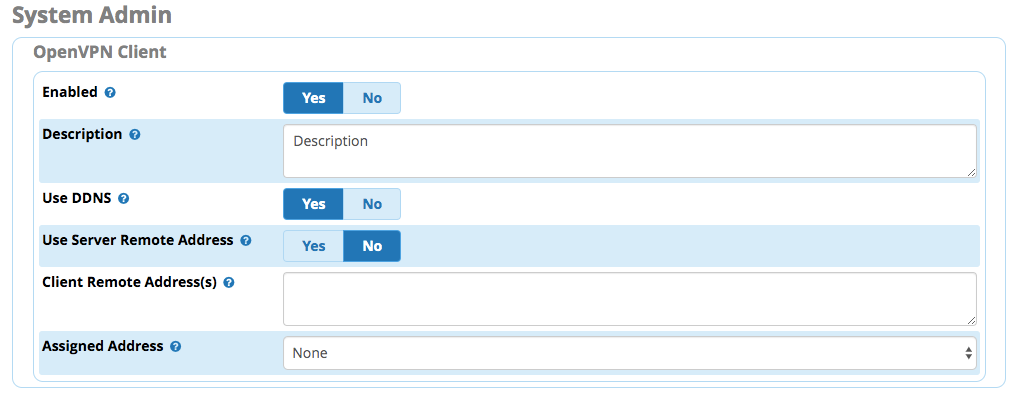
- Download the client files: sysadmin_ca.crt, sysadmin_client1.conf, sysadmin_client1.crt, sysadmin_client1.key, and sysadmin_client1.ovpn.
In pfsense:
- Go to System >> Certificate Manager >> CAs >> Add. Change Method to “Import an existing Certificate Authority”. Give it a Descriptive name. Copy and Paste content of sysadmin_ca.crt i to Certificate data and Save.
- Go to System >> Certificate Manager >> Certificates >> Click Add/Sign >> Change Method to “Import an existing Certificate” >> give it a Descriptive name >> Copy and Past content of sysadmin_client1.crt (everything!) into Certificate data & content of sysadmin_client1.key into Private key data >> Save.
- Go to VPN >> OpenVPN >> Clients >> Click Add >> Keep all defaults except >> Server host or address (you FreePBX IP address), Server port (FreePBX VPN port default is “1194”) >> give it a Description >> Uncheck Use a TLS Key in TLS Configuration >> Peer Certificate Authority select the CA created above >> Client Certificate select the Certificate created above >> Encryption Algorithm “AES-128-CBC (128 bit key, 128 bit block)” >> Enable NCP Checked >> NCP Algorithms AES-128-GCM, BF-CBC, AES-256-CBC >> Auth digest algorithm SHA1 (160-bit) >> Optional Hardware Crypto >> Compression LZO Compression [compress lzo, equivalent to comp-lzo yes for compatibility] >> Custom options auth-nocache;resolv-retry infinite;persist-key;Persist-tun; remote-cert-tls server; ignore-unknown-option block-outside-dns; >> Gateway creation IPv4 only >> Click Save.
- Go to Interfaces >> Interface Assignments >> Available network ports >> Click add next to the VPN client created >> Under Interface click to the name to open >> Enable checked >> Description give it a name >> Click save.
- Go to Firewall >> Aliases >> IP >> Click add >> give it a Name and Description >> Type “Host(s)” >> IP or FQDN add IP addresses of the VoIP phones >> Click save.
- Go to Firewall >> Rules >> LAN >> Action Pass >> Address Family IPv4 >> Protocol Any >> Source Single host or alias and type the Alias name of the IP phones >> Destination Any >> Advanced Options >> Gateway select the interface created above >> Click Save.
- Go to Firewall >> NAT >> Outbound (! may need to change the mode to Manual Outbound NAT rule generation. (AON - Advanced Outbound NAT) and click save) >> Click Add >> Interface select the one created from the VPN Client >> Protocol Any >> Source Network (your network range for example 192.168.1.0/24) >> Destination Any >> Address Interface Address >> Click save.
Go to Status >> OpenVPN >> It should be up.
Go to FreePBX >> System Admin >> VPN Server >> pfsense client should be connected.
2. Yealink
Some Yealink phones have vpn capability. In contrary to the official documentations, this alternative method only uses one configuration file.
Step-by-step guide
- Enable VPN Server in FreePBX

- Create VPN Client

- Download the client files: sysadmin_ca.crt, sysadmin_client1.conf, sysadmin_client1.crt, sysadmin_client1.key, and sysadmin_client1.ovpn.
- Open a text editor and create a file and name it
vpn.cnfand put the following:
client
dev tun
proto udp
remote [SERVER_IP]
port [SERVER_PORT]
resolv-retry infinite
nobind
persist-key
persist-tun
remote-cert-tls server
key-direction 1
cipher AES-128-CBC
auth SHA256
comp-lzo
verb 3<ca>
-----BEGIN CERTIFICATE-----
…
-----END CERTIFICATE-----
</ca>
<cert>
Certificate:
…
-----END CERTIFICATE-----
</cert>
<key>
-----BEGIN PRIVATE KEY-----
…
-----END PRIVATE KEY-----
</key>
- Compress the file to TAR.
- In the Yealink phone go to Network >> Advanced >> Upload VPN Config >> Browse the TAR file >> Click Upload >> then Click Enable >> Confirm.

- Go back to FreePBX VPN Server to confirm the connection of the phone