Cloud-based install: Firewall completely locks me out during setup

Hello. Sorry this isn’t a pithy tl;dr type post, but I figured giving more context information in the beginning would save a lot of “yeah I already tried that” since I’ve literally been at this now for days with no solution…

I have FreePBX installed (for experimentation purposes; nothing for actual Production yet) on a Linode. The Linode has a static IP address exposed to the Internet by default, and I have installed the latest stable distro of FPBX from their site. The install goes fine, but around the time it turns on the Firewall, and then the Responsive Firewall, I completely lose connectivity to the server. This means the web page GUI dies, and even if I try to SSH into the server, my session dies if I’m already in, and refuses to connect if I try after all this starts.

At first I thought the whole Linode was dying (e.g. server crashed / locked up) since there we just no signs of life all of a sudden. After using their internal “LISH” console however, I discovered taht I actually could log on to the terminal, but it was just refusing anything from outside. I could ping from my Windows machine to the server, but once this starts I would get "Reply from my.ip.address.here: Destination port unreachable.

I’ve seen people suggesting to turn off the firewll with fwconsole firewall disable, which does indeed turn off the firewall, but it didn’t seem to fix this problem. Ultimately, I tried the more extreme move of fwconsole ma delete firewall, which (after a reboot) worked. Reinstalling the package from within the GUI system and pacakges update screen immediately locked me out all over again. Again going to LISH (the only way to get back onto my machine at this point), fwconsole ma delete firewall and I am once again back in the machine-- GUI, SSH, and my phones (once set up) are connecting.

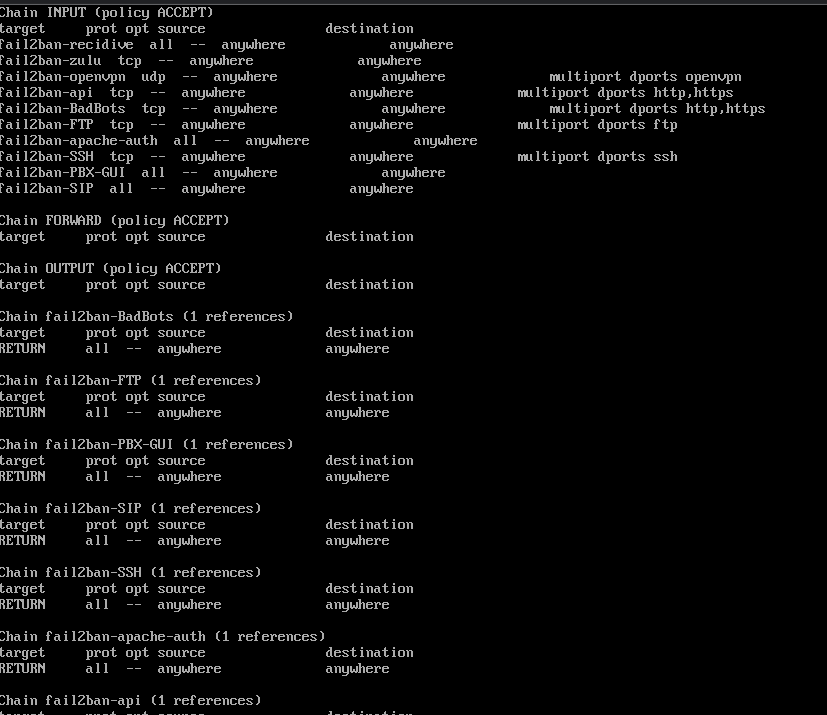
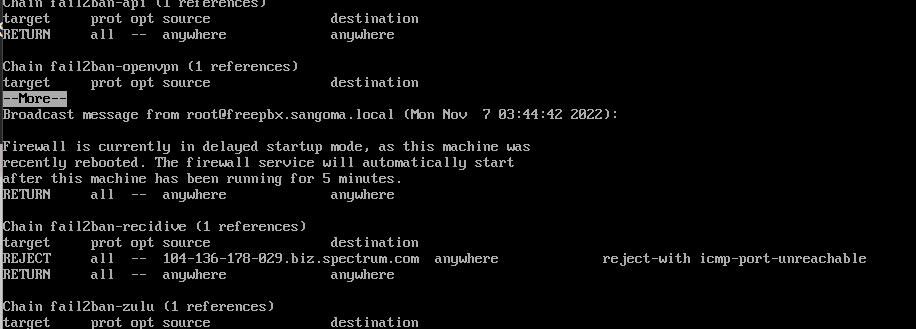
I did run iptables -L and, although I don’t entirely understand everything I read in there, I don’t see anything related to my IP address that woudl indicate that I’m being blocked. I obviously don’t want to wire this thing up to my SIP trunk with the firewall completely ripped out, but I do not understand why it’s doing this… and BTW, with the firewall installed, my public, external IP address from my machine here is in the whitelist.

Any suggestions as to how I can determine what’s going on here/ It seems odd that this thing would so drastically ban you right out of the box on install. I’m obviously grateful for the security but I need this to work without just unplugging stuff until it does. :slight_smile: Thank you anyone for your help here!

If you are clear on the firewall, you may still get banned by the fail to ban service. Whitelisting your ips and trusting your ips will stop both the firewall and fail to ban from. Impacting you. If you need to access the box after you’re locked out, two quick reboots will bring down the security systems allowing you to update both modules.

https://wiki.freepbx.org/display/FPG/System+Admin+-+Intrusion+Detection
https://wiki.freepbx.org/display/FPG/Firewall

Iptables, whether you agree or not, will have a rule allowing or denying, the rules can be generated by any number of processes, mostly firewalls and fail2ban

Thank you for that… We do seem to be making progress at least… So I re-installed the firewall module, and then went back to my GUI login, where it starts taking me through the process of setting up the firewall. However, as I start answering question, I keep getting locked out. I went ahead and rebooted twice in succession to see if I could get a little time (nowhere near five minutes), and now this time I got to where it asks me if I want to auto-configure Asterisk IP settings:

Automatically configure Asterisk IP Settings?

Firewall should now auto-detect and configure External IP settings. This will assist with NAT or Translation issues.

You should say ‘Yes’ to this, unless you have an extremely complex network with multiple external default gateways.

You can verify these settings in Sip Settings after this wizard is complete. If you have a non-static IP address, you may need to use a DDNS provider which will require manual configuration.

Warning

Selecting ‘Yes’ will update your current configuration. Selecting ‘No’ will not change your current settings.

External Address: [my.cloud.external.ip-address]

Known Networks:

  • [my.cloud.external.ip/subnet]

Okay… so what am I looking for in there? I’m on my LISH console now…

iptables -L | more

Where is this? Is it in the standard install images or marketplace? I’m not able to find it.

https://downloads.freepbxdistro.org/ISO/SNG7-PBX16-64bit-2208-2.iso

Okay so I found this entry in iptables, and this is my current IP address from my ISP… Now, why is it blocking / banning me, since I’m already whitelisted???

Well, hopefully I have fixed the problem… FWIW, I did see the “biz.spectrum” entry in iptables earlier w/ a REJECT next to it, but I don’t think I caught that it was my IP address. I think this actually happened way back when I first did one of the installs (I’ve installed / re-installed this thing a dozen times trying to get stuff to work)… so I’m surprised it stuck around, but I initially didn’t have a root account set up, and kept trying to SSH into it, and eventually got myself banned. I did fix that though (whitelisted myself) and I’m pretty sure I’ve installed at least once since then, so I don’t really know how I ended up in there, and even then it seems like it should have gone away after the configured 30 minutes. I dunno.

I guess we’ll see if it magically bans me again at some point. I did once again add my public IP for my PC to the whitelist (which also kind of corobberates my theory that I’ve re-installed since the time I know I locked myself out.) It does appear to be working though, as I now see a new IP address being banned (from China, there’s a big surprise), which is why experimental or not, I wanted this thing firewalled.

Just posting this final update as everything seems to be working. I’m not sure how it got in that state, but at least it’s working. I want to say a HUGE thank you to the people who responded incredibly quickly to me at this very late hour. Your input gave me some new avenues to explore and new things to try, and we got it, so thanks!

For anyone who might be experiencing this issue, or just in case anyone is interested in what was actually going on here… fail2ban has different “jails” that it puts offenders in. Basically, an IP adddress is an offender if it fails to authenticate more than x times within a y-second window, x and y being configurable values that are 8 failed attempts for x and 600 seconds or ten minutes for y. Once that happens, they’re banned for z seconds (1800, or 30 minutes, by default). If an IP address gets banned more than five times in the same day, fail2ban has a special jail for them, called “recidive”. In this jail, they will stay banned for 7.5 days (I’m not sure where you configure this. I didn’t learn about it in freepbx, but rather learned about it trying to figure out the nature of the jail where I found my own IP address in iptables, this fail2ban-recidive jail.) It knows you’ve been banned 5 times because it looks for previous bans for your IP address in its own log files (see below.)

Based o nthat, it would seem that I got fail2banned > 5 times in the past 24 hours, but I don’t see how that would have happened. Moreover, as I look through the fail2ban logs (which, BTW are in /var/logs/fail2ban.log and fail2ban.log-yyyymmdd for each day), I actually don’t see my IP address in there anywhere, so I don’t know how the heck I got sent to the fail2ban penitentiary for repeat offenders, but that would seem to be why I kept getting locked out, despite whitelisting myself.

To get myself paroled, I neded to get to the command line (had to use the GLISH terminal on Linode since I was locked out of SSH), and find myself in iptables to see what jail I was in. That’s where I saw the entry you’ll see in the thread below. In this case, I was in the jail fail2ban-recidive and I was the first entry (e.g. 1), so the command to get myself paroled was:

iptables -D fail2ban-recidive 1

…and just like that, my GUI and SSH were working again (no rebooting, no reloading, no configuration refreshing). I really hope this information benefits someone else. At least that will help give some meaning and purpose to all my suffering for the past three days… and thank you once again to those who responded!

1 Like

Thanks. I misunderstood you, since you said it was installed “from their site” - thought you meant Linode offered it directly.

No, they (Linode) doesn’t offer a pre-bundled image, but it’s actually really easy to do it yourself. When Linode creates a ready-made image, you can just take that script, but since you need to run the installer anyway, just making an image out of the ISO is a really easy thing to do.

On Linux, you can use the curl command. curl (I think it’s pronounced “See-U-R-L”, basically takes a URL you specify and then emits it (to stdout by default). So, you can get the URL (in this case the URL I provided up above, but you can get that by going to the freepbx page and then finding the version you want, right-clicking the link for the ISO image, and then just do a “copy URL” instead of downloading it).

To do all this, you’ll set up your Linode with a disk big enogh to hold FPBX. At a minimum, I’d recommend a minimum plan w/ a shared CPU, 2 cores, 4 GB RAM, and an 80 GB hard disk. You can probably get away with less, but if you really want to do anything useful you’ll want to have room on the disk for files and the digital audio processing required to handle the call traffic does use some CPU resources. Anyway, you’ll want to give 3GB of that disk to /dev/sdb as a “raw” partiion. This will be your “installer” disk. Then, allocate the rest of the disk as another “raw” partition as /dev/sda. This is where the installer will write the FPBX install.

Power on your new Linode and use the “Rescue” console to to a command prompt. Here, you’ll use the curl command to get the ISO image from the freepbx site, and pipe that image into the dd command, which will then write the image onto the /dev/sdb disk. Once that’s done, you’ll reboot your Linode to /dev/sdb disk, and use the LISH console to run the installer.

Now you’ll use the curl command (I think it’s procounced “see-U-R-L”) to copy the contents of the iso image and emit them directly to your /dev/sdb partition, which you’ll then boot in order to run the installer. To do this, type the curl command at the prompt, and then paste that URL after the curl command, and then use the pipe operator ( | ) to redirect the output of curl to the destination disk where you’re writing the installer image.

The command you’re typing will look something like this:

curl https://downloads.freepbxdistro.org/ISO/SNG7-PBX16-64bit-2208-2.iso | dd of=/dev/sdb

The command you’re piping into is the dd command, which stands for “direct to disk”. to that command, you add the paramater of=/dev/sda (of for “Output File”, and then /dev/sdb would be the mount point of the disk you’re going to write to (the 3GB partition you created above.) The dd command does a binary write directly to the disk with the contents of that iso file. So basically you’re telling Linux to go to this URL and then emit the contents of it (which happens to be an iso disk image) into the input of dd, which will send that to the destination specified, which in this case is /dev/sdb. /dev is where your devices are on the Linux tree, and sdb would be the second hard disk.

When the curl command and dd commands are done, you’ll want to reboot your Linode, booting to sdb so you are running the install image. Once the machne is up and running, connect to the LISH console, and just accept the defaults (Choose the recommended FPBX and Asterisk versions, VGA install, etc). The screen looks kind of wonky, and you just use the keyboard. The only key you’ll need to press through these is ENTER if you just accept the defaults. After the last prompt you’ll want to switch to the GLISH console as that’s the graphical display where you can see the installer running. Not much to do here except set a root password and set your time zone. It takes about five minutes for it to install FPBX.

When it’s done, rather than click the roboot button on the install screen, use your Linode console to reboot your Linode, but now boot it to sda. That should be it. You can now open a web browser and go to the fqdn or IP address of your FBPX install and complete the setup in the UI.

I probably told you a hundred things here you already know, but I hope it benefits another user might not know them. Linux is an incredibly powerful and easy system to use, but the one challenge I’ve always had with it is that if you don’t know something, it can be nearly impossible to figure it out, because some aspects are just not that intuitive.

This topic was automatically closed 31 days after the last reply. New replies are no longer allowed.