Hi good people,
No issues here I just wanted to share with you how I expanded the drive of my freepbx import in aws.
So I followed the advice on this topic How to install Freepbx Distro on Amazon AWS EC2 machine - #34 by casan12 and created a virtual machine which I then imported to aws and my instance was running with almost no issues however as noted in the aforementioned topic even if when you launch the instance you assign it a bigger drive then what you originally had on the virtual machine the system will still run on the original size, to overcome this @yitzyf recommended to use growpart to grow the partition but it seems that there are more steps involved so I did some digging and figured it out, I should have posted this on that topic but it’s already closed so I’m posting it here so that if anyone else has this issue I hope I can save them some time.
My virtual machine originally had a 20GB drive and I launched it with a 200GB drive your situation may vary but the same instructions should apply, also since we are gonna play with partitions make sure to create a backup image in AWS before continuing.
So after you launch the instance with a bigger drive log in with ssh.
Run lsblk to list disks, partitions, lvms and structure:
[root@freepbx ~]# lsblk
NAME MAJ:MIN RM SIZE RO TYPE MOUNTPOINT
xvda 202:0 0 200G 0 disk
├─xvda1 202:1 0 2G 0 part /boot
└─xvda2 202:2 0 18G 0 part
├─SangomaVG-root 253:0 0 15.2G 0 lvm /
└─SangomaVG-swaplv1 253:1 0 2G 0 lvm [SWAP]
What this tells you is that you have one disk xvda with 200GB, the disk has 2 partitions xvda1 which is the boot partition with 2GB and xvda2 with 18GB, on the xvda2 partition there’s a volume group named SangomaVG which contains 2 logical volumes (LVM) SangomaVG-root which is mounted at / with 15.2GB this is the one you wanna expand and then a swap volume SangomaVG-swaplv1 with 2GB.
If you login to the web gui and check the storage in system admin you will indeed see Drive Usage 4,851.02M / 15,594.00 M (32%)

Next run fdisk -l to display more info on partitions and lvms:
[root@freepbx ~]# fdisk -l
Disk /dev/xvda: 214.7 GB, 214748364800 bytes, 419430400 sectors
Units = sectors of 1 * 512 = 512 bytes
Sector size (logical/physical): 512 bytes / 512 bytes
I/O size (minimum/optimal): 512 bytes / 512 bytes
Disk label type: dos
Disk identifier: 0x000d3918Device Boot Start End Blocks Id System/dev/xvda1 * 2048 4098047 2048000 83 Linux
/dev/xvda2 4098048 41943039 18922496 8e Linux LVMDisk /dev/mapper/SangomaVG-root: 16.4 GB, 16361979904 bytes, 31956992 sectors
Units = sectors of 1 * 512 = 512 bytes
Sector size (logical/physical): 512 bytes / 512 bytes
I/O size (minimum/optimal): 512 bytes / 512 bytesDisk /dev/mapper/SangomaVG-swaplv1: 2147 MB, 2147483648 bytes, 4194304 sectors
Units = sectors of 1 * 512 = 512 bytes
Sector size (logical/physical): 512 bytes / 512 bytes
I/O size (minimum/optimal): 512 bytes / 512 bytes
This shows you the full names of the the partitions and LVM’s along with some other useful info, Take note of the partition and LVM names.
If you run vgdisplay it will display Volume group information:
[root@freepbx ~]# vgdisplay
— Volume group —
VG Name SangomaVG
System ID
Format lvm2
Metadata Areas 1
Metadata Sequence No 4
VG Access read/write
VG Status resizable
MAX LV 0
Cur LV 2
Open LV 2
Max PV 0
Cur PV 1
Act PV 1
VG Size 18.04 GiB
PE Size 4.00 MiB
Total PE 50699
Alloc PE / Size 4413 / <17.24 GiB
Free PE / Size 46286 / 180.80 GiB
VG UUID sE36sO-ye0A-FeW9-AM4F-a0kv-nysi-MvIfGc
All good so far now to the actual editing you will need to follow these 4 steps:
- expand partition.
- expand volume group to take advantage of new partition space.
- expand logical volume SangomaVG-root within the volume group.
- expand underlying file system after logical volume expansion.
1. Use growpart to expand the partition.
Install growpart:
[root@freepbx ~]# yum install cloud-utils-growpart
Extend partition 2 in /dev/xvda to fill empty space until end of disk or next partition:
[root@freepbx ~]# growpart /dev/xvda 2
CHANGED: partition=2 start=4098048 old: size=37844992 end=41943040 new: size=415332319,end=419430367
Run lsblk again to verify that partition xvda2 was expanded:
[root@freepbx ~]# lsblk
NAME MAJ:MIN RM SIZE RO TYPE MOUNTPOINT
xvda 202:0 0 200G 0 disk
├─xvda1 202:1 0 2G 0 part /boot
└─xvda2 202:2 0 198G 0 part
├─SangomaVG-root 253:0 0 15.2G 0 lvm /
└─SangomaVG-swaplv1 253:1 0 2G 0 lvm [SWAP]
It now shows xvda2 has 198GB great!
2. expand volume group to take advantage of new partition space.
This command resizes the amount of space that a LVM volume group can use on a partition and needs to be run if you resize its partition:
[root@freepbx ~]# pvresize /dev/xvda2
Physical volume “/dev/xvda2” changed
1 physical volume(s) resized / 0 physical volume(s) not resized
Run vgdisplay to confirm volume group resize:
[root@freepbx ~]# vgdisplay
— Volume group —
VG Name SangomaVG
System ID
Format lvm2
Metadata Areas 1
Metadata Sequence No 4
VG Access read/write
VG Status resizable
MAX LV 0
Cur LV 2
Open LV 2
Max PV 0
Cur PV 1
Act PV 1
VG Size 198.04 GiB
PE Size 4.00 MiB
Total PE 50699
Alloc PE / Size 4413 / <17.24 GiB
Free PE / Size 46286 / 180.80 GiB
VG UUID sE36sO-ye0A-FeW9-AM4F-a0kv-nysi-MvIfGc
It now shows VG size as 198.04 GB great!
3. expand logical volume SangomaVG-root within the volume group.
Now we need to resize the logical volume, SangomaVG-root, remember the full name from earlier whae we ran fdisk -l ? good, We use lvresize for this. There is a funny looking argument that is passed to resize. We don’t say that we want to fill the rest of the volume, we say that we want to add 100% of the free space to the volume.
[root@freepbx ~]# lvresize -l +100%FREE /dev/mapper/SangomaVG-root
Size of logical volume SangomaVG/root changed from <15.24 GiB (3901 extents) to 196.04 GiB (50187 extents).
Logical volume SangomaVG/root successfully resized.
Now re-run lsblk to make sure the LVM was expanded:
[root@freepbx ~]# lsblk
NAME MAJ:MIN RM SIZE RO TYPE MOUNTPOINT
xvda 202:0 0 200G 0 disk
├─xvda1 202:1 0 2G 0 part /boot
└─xvda2 202:2 0 198G 0 part
├─SangomaVG-root 253:0 0 196G 0 lvm /
└─SangomaVG-swaplv1 253:1 0 2G 0 lvm [SWAP]
It shows us that LVM SangomaVG-root now has 196GB great!
4. expand underlying file system after logical volume expansion.
Finally we want to resize the actual underlying file system on the logical volume. Since we’re using centos and xfs file system we will run xfs_growfs:
[root@freepbx ~]# xfs_growfs /dev/mapper/SangomaVG-root
meta-data=/dev/mapper/SangomaVG-root isize=512 agcount=4, agsize=998656 blks
= sectsz=512 attr=2, projid32bit=1
= crc=1 finobt=0 spinodes=0
data = bsize=4096 blocks=3994624, imaxpct=25
= sunit=0 swidth=0 blks
naming =version 2 bsize=4096 ascii-ci=0 ftype=1
log =internal bsize=4096 blocks=2560, version=2
= sectsz=512 sunit=0 blks, lazy-count=1
realtime =none extsz=4096 blocks=0, rtextents=0
data blocks changed from 3994624 to 51391488
Now go back to the web gui and refresh the system admin storage page:
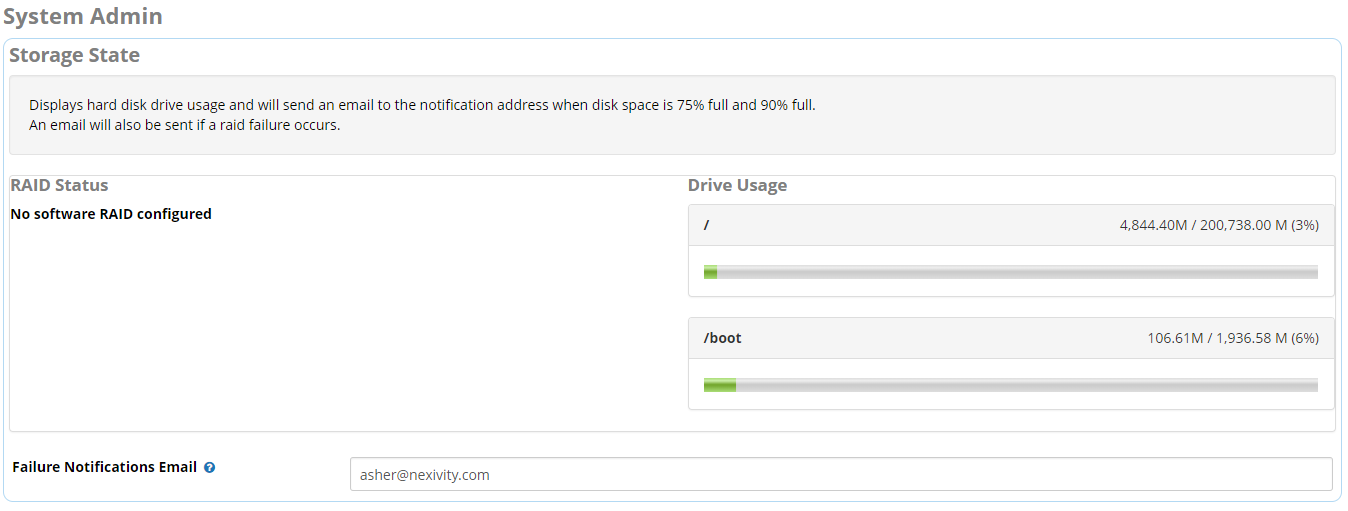
New storage showing!!
Credit and sources:
https://centos.pkgs.org/6/epel-x86_64/cloud-utils-growpart-0.27-10.el6.x86_64.rpm.html